• Facebook
  • Instagram
Ministry to Women
  • Home
  • About Us
  • Hubs
    • Christian Living
    • Leadership
    • The Village
    • Young Adults
  • Resources
    • Barefoot Cinderellas
    • Gather
    • Grow Curriculum
    • Mission Moving Women
    • National Programs
    • Women of Hope
  • Contact Us
  • Subscribe
  • Search
  • Menu

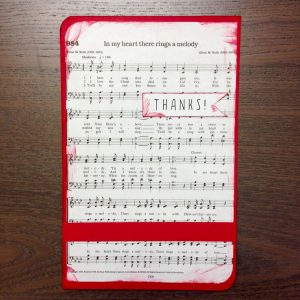
GREETING CARDS

SUPPLIES
  • Salvation Army Song Book
  • Cardstock Paper
  • Glue/Glue dots
  • Scissors
  • X-acto Knife
  • Optional: Corner punch
  • Optional: Dew Drop Ink Pads
INSTRUCTIONS

This project is pretty much ‘make it however you want it.’ Here’s a rundown of the steps:

  • Pick out the color cardstock you would like to use, and decide on your songbook selection
  • Fold the cardstock in half to make the card
  • Using an x-acto knife, remove your songbook selection from the songbook
  • Glue the page onto the cover of your card
  • Embellish! Round the corners, layer a colored paper under the songbook page, stain the edges, add stickers, ribbon, etc.
  • Make sure to include the greeting on the front of the card somewhere as well (‘Happy Birthday’, ‘Get Well Soon’, etc)

We like the ideas shown here, here, and here

THOUGHTS

Love this idea! Not only is it fairly simple, but it’s completely customizable to your tastes as well.  The songbook page/song adds that ‘extra touch’ that the recipient will appreciate, and if the song is purposefully chosen, the lyrics can only enforce the message of the card. This would be a great craft or project for your older youth and women’s groups.

COASTERS

SUPPLIES
  • Salvation Army Songbook
  • Coasters (wood, or ceramic from a home improvement store)
  • Mod Podge
  • Scissors
  • X-acto Knife
  • Foam Brush
  • Felt or cork
INSTRUCTIONS

FYI – We created these using wood coasters, so the steps are a little different than if you used ceramic (here).

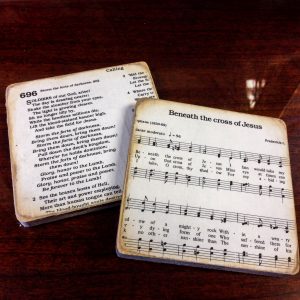
  • Use wood stain to stain your coasters (or paint them), following the directions on the container
  • Using an x-acto knife, remove your songbook selection from the songbook
  • Apply a layer of mod podge onto the top of the coaster with your foam brush and immediately place the songbook page
  • Carefully press the paper onto the coaster, pushing out any air bubbles so it lays completely flat
  • Apply a coat of mod podge over the songbook page, using brush strokes that go in the same direction (left to right, right to left). Allow to dry.
  • Apply a second coat, changing the direction of your  brush strokes (up and down). Allow to dry.
  • Apply a few more coats following the instructions above, to ensure your coasters are water resistant and the paper is protected (OR – when you’re completely done, spray the top of the coaster using this)
  • Optional: Use Tacky Glue to adhere felt to the bottom of your coaster
THOUGHTS

This craft is both easy and cheap to make, and it prolongs the life of the songbook pages! (We used wooden coasters from Michaels (here) but you can also use ceramic tiles from a home improvement store). While it’s an easy enough craft for youth to complete, we think it’s the adults who would appreciate the sentimentality of the Songbook coasters. Consider making a set to gift someone, or to leave out in your social services office for clients to read and use during their visits. This could be said of all the crafts listed here as well, but if a particular song is the perfect choice for a particular project, make copies of the song instead of having to cut one out from each and every old songbook.

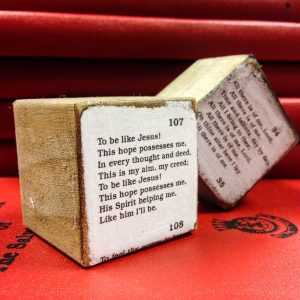
DECORATIVE BLOCKS

SUPPLIES
  • Salvation Army Song Book
  • Wood blocks
  • Mod Podge
  • Foam Brush
  • Scissors or X-acto Knife
  • Optional: Dew Drop Ink Pads
  • Optional: Wood Stain
  • Optional: Sandpaper
INSTRUCTIONS

FYI – While we used wood blocks, you can pretty much mod podge paper onto anything, so feel free to get creative if blocks aren’t your thing!

  • Stain or paint your wood blocks; allow time to dry
  • Select portions of the songbook you’d like to use – leave extra room around the song when you cut it out
  • Optional: tear the edges of the paper, or stain with ink pads
  • Apply a thin layer of mod podge to one side of the block, then place songbook song
  • Quickly and carefully rearrange the paper on the block to its correct positioning before it fully adheres
  • Place the block with the paper covered side face down on the table; press down on the block firmly so it doesn’t move while you use the x-acto knife to remove excess paper around the song (if you didn’t cut it out exactly to size)
  • Repeat steps until all desired sides of block have been covered; allow time to dry
  • Optional: Take sandpaper and rough up the edges of the block and paper; wipe off dust with cloth
  • Once ready, apply multiple coats of mod podge on each face of the block, allowing time to dry between each coat
THOUGHTS

Aren’t these cute?! This was one of those crafts where we were just like, okay, what’s lying around that we could use (you can pretty much mod podge paper onto anything)? And lo and behold, these wood blocks (from Michaels) caught our eye and we were finally able to give them purpose! Clippings from the chorus section of the songbook were where we pulled form, as they were short and just the right size for these small blocks. As for their purpose, well – decoration of course! Treat them as you would a knick-knack, tucking them next to a vase of flowers, on a mantle, next to your computer monitor… They’re small and inconspicuous, but also provide something you can meditate on as they catch your eye.

CLOCK

SUPPLIES
  • Songbook
  • Utility knife or X-Acto knife
  • Optional: Power Drill
  • Clock kit (here)
  • Optional: Super Glue
INSTRUCTIONS
  • Determine where you want to place the clock on the songbook – for the exact middle (as shown), make sure to use a ruler for accuracy
  • Using your x-acto knife or drill, make a hole in the cover where you want your clock to go
  • Hollow out the songbook (starting with the first page) using your knife or drill, to the exact size and depth of the clock mechanism (it will have to sit in there snug)
  • Place the mechanism inside the book and attach the hands (follow package instructions)
  • Optional: Add the provided numbers to the ‘face’ of the clock

Download: Clock Tutorial

THOUGHTS

This is certainly a unique craft as well as a conversation starter! The only purchase you should have to make is for the clock kit (if you already have an x-acto knife and batteries) – just don’t forget to use a coupon! This project makes for a cheap, easy, sentimental, and long-lasting clock perfect for adorning a room in the corps or the mantle in your house. Beware: you’ll often find yourself correcting people, “No, I didn’t buy this at Trade — I made it!!”

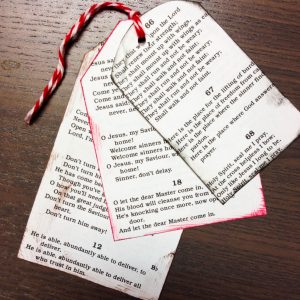
TAGS

SUPPLIES
  • Salvation Army Songbook
  • Scissors
  • Ribbon/String
  • Hole punch
  • Optional: Tag Punch
  • Optional: stamps, corner punch, ink pads
INSTRUCTIONS
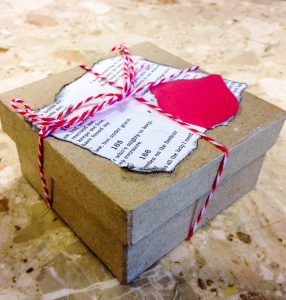
  • If you have a tag punch, use it create the initial tags. Otherwise, you can either print and cut out a template and use that to make sure you get the right tag shape, or you can do it ‘freehand’ and hope for the best!
  • Use your hole punch to create the hole for the ribbon to go through
  • Embellish the tag – apply stamps, stain the edges, add accent colored paper, whatever you’d like!
  • Add the ribbon last, and you’re good to go!

We like variations we see here, here, and here!

**With a few extra adjustments and a laminator, you can turn these gift tags into handy bookmarks!

THOUGHTS

This is an indulgence – no one needs songbook gift tags, but they sure would appreciate them! 🙂 Or so we tell ourselves, right? We like how easy they are to make, and take very little skill so someone who is not ‘creative’ would have a hard time messing these up. They’re great to add to little gifts, either as the main tag, or as an additional layer to go behind another tag, as an accent.

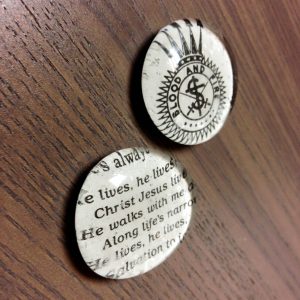
MAGNETS

SUPPLIES
  • Songbook
  • Jumbo Clear Mosaic Gems (bought ours at Hobby Lobby)
  • Mod Podge
  • Foam Brush
  • Magnetic Strip
  • Scissors
  • X-acto Knife
INSTRUCTIONS
  • Place a mosaic gem on top of the songbook page you’d like to use and reposition until it is where you want it
  • Remove the gem and put a light layer of mod podge on the bottom (flat side)
  • Carefully replace the gem on the songbook page and quickly reposition if needed (before it dries)
  • Allow it to dry and then carefully take your x-acto knife and cut around the gem to remove excess paper (or you can trace the gem and cut it out before applying mod podge)
  • Cut off a piece of magnet from the strip (we made a piece that was about half the size of the gem), remove the backing and place it on the gem. Press firmly
THOUGHTS

Aren’t these just the bee’s knees?! They’re cute and easy to make – it was actually hard to stop at two, when I really wanted to make dozens and stick them everywhere around THQ. If you buy the gems at a craft store, make sure to use a coupon; they’re sold at Dollar Tree but in a MUCH smaller size that would not have worked well with this project.

UPCYCLING THE SCRAPS… OF AN UPCYCLE

SUPPLIES
  • Songbook
  • Scisssors
INSTRUCTIONS

We have a winner for easiest.upcycle.craft.yet!

  • Pick out a scrap piece of songbook paper
  • Tear off the edges to give it a ‘rough’ look or use scissors to clean up the paper some
  • Place on gift, or wherever

Done!

THOUGHTS

This isn’t like, the most amazing use of songbook pages, but we found we had a bunch of random scraps left over from other projects and didn’t know what to do with them! So take this as ‘upcycling the scraps of an upcycle.’

For more ways on ‘upcycling scraps’, try this, this, this, and this

BOOK FOLDING

SUPPLIES
  • Songbook
  • Bone Folder
INSTRUCTIONS

This is so complicated, we’re handing you off to an outside source for tutorial help. Visit this page – Best of luck!

THOUGHTS

Okay, don’t make fun – we know how rough this looks. We’ll call it, ‘The Craft Where We Bit Off More Than We Could Chew.” So heed our warning, this is the most complicated, frustrating craft on this list. However, the end result is worth it, especially when you see what other brave souls have been able to pull off on Pinterest (see here).

OTHER IDEAS WE LIKE

‘Fine Art’ (Click HERE)

Whatever this is  (Click HERE)

1,000 times THIS!!! (Click HERE)

Finally, ALL of these (Click HERE)

National Salvation Army Week 2016 Test Your Knowledge of The Salvation Army
Scroll to top